Author Archives: anachostic - Page 12

Project: Cooking Hinges

I have four closets in the house that have bi-fold doors.  With the updating of the door hardware to nickel, I have a small issue with the hinges on these bi-fold doors.  They’re brass and I wasn’t able to find any drop-in nickel replacements for them.  Well actually, the hinges are painted over, which might be even worse than being brass.

It’s not a huge deal because you only see the hinges when the doors are open (that’s how bi-fold doors work).  But still, I want things to look good when they’re visible.  So, I think that having the hinges unfinished instead of painted will be an improvement, and I want them to at least look like they are nickel.  So, I’ll just spray paint them and hope that looks sufficient.

But first, I have to get the old paint off.  I heard from the Internet that this is a simple task involving heat and water.  I’m pretty sure it is, because I used the same technique when getting the paint off my closet shelving brackets.  But this is probably going to take a while to get off.  To accomplish this, I purchased a cheap $20 crock pot and the hinges will soak in water on high heat throughout the day.  The paint should be “fall off the bone” ready when I get back from work.

While prepping for that, after removing all the hardware from one door, I got to try out my new sawhorses.  With the doors propped up, I sanded down the edges of each part of the door and scuffed up the surface for the new paint.

If this soaking and spray painting trick doesn’t work out, a subsequent search with more appropriate keywords brought up some places to find my hinges.  Not knowing what the hinge is called was holding me back.  Apparently, the hinge is a “3-leaf mortise hinge” and is commonly used for shutters.  …And my doors, for whatever reason.  I would need 18 of the things, which would cost about $40.  That’s a bit more than the cost of the spray paint and crock pot that I bought, so maybe it won’t come to that.

And while I’m at it, the two single bi-fold doors on the linen closets need some adjustment.  The top anchor seems to have drifted a little, so the door presses up against the wall when closed.  In both cases, it’s actively damaging the wall, so I need to repair the wall and adjust the anchor.  Not sure why I lived with it like that as long as I did.

The soaking did the trick.  The paint just slid right off.  However… the painting of the first set of hinges resulted in some pretty shitty results.  Terrible-looking.  I know I said I wanted everything in my remodel to be quality, so I don’t even know why I cheaped out on this.  So, I guess I’m ordering new hinges for those doors, too.  And no more slow cooking brass.

Product: Alico Lighting

In a previous post, I mentioned I purchased a ceiling light (specifically the Alico Lighting FML2030-10-16M) that felt rather expensive.  Yes, it did seem that way, and when I casually asked a co-worker how much he would pay for a new light fixture in a closet, he said $20.  I then informed him that fixtures are more expensive that he might think.  So he upped it to $50.  Then I explained how anything I was looking at was at least $75 and told my story.  He wasn’t all too impressed by my final decision.

But, I think I am.  When I got the package in the mail, I opened it up and was very impressed with what I saw.  The light base was solid.  Nice thick metal.  The globe was nice and uniform, smooth, and made with thick, solid glass.  So far, everything is built very well.

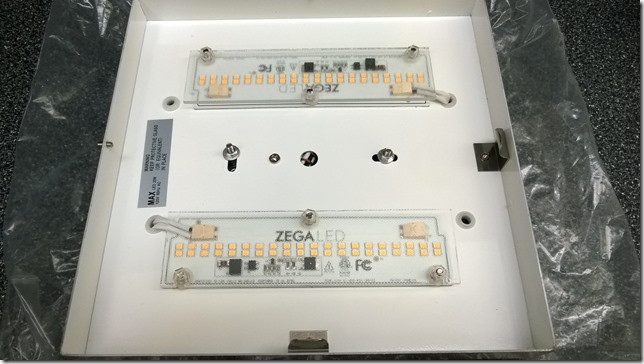
I mentioned the light is LED.  Check out the LED arrays installed in the light.  There’s two of them, each with an elevated glass diffuser plate to scatter the light throughout the globe.

WP_20160727_001

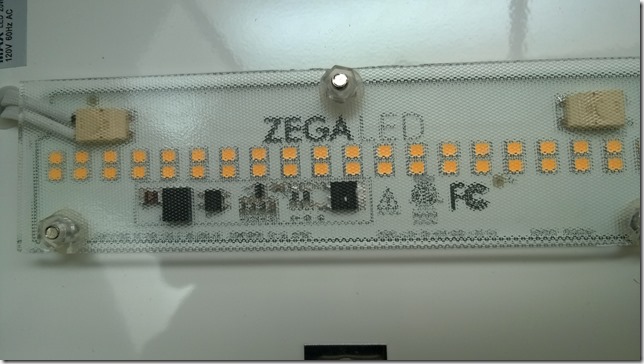
Here’s a close up of one of the arrays:

WP_20160727_002

Pretty nice design, I must say.

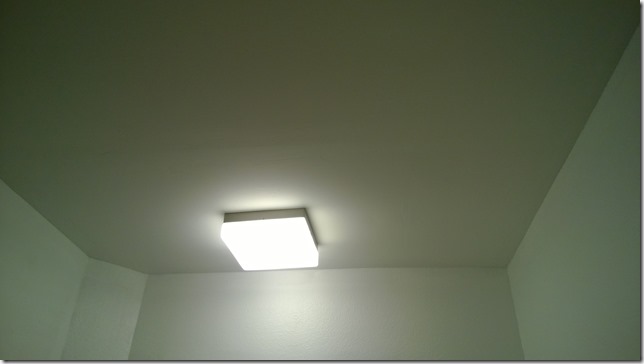
Of course, all the required hardware is included and a small allen key for the set screws that hold the globe in place.  Mounted, there’s not really much to say about it.  It’s damn bright.  In a small closet with white ceilings and white walls, it’s more than fully sufficient.

WP_20160727_003

This light is the 9” version and I will probably buy the 6” version for another bathroom ceiling light when the time comes to redo that room.  I’m very satisfied with the quality of these lights.  Yes, this light was $150 and the 6” version is going to be $70, but I am fairly certain they will last for many, many years and look great doing it.

Cleanup: Day Z

This weekend was the final straw.  After a few weeks of slowly disposing the excess leftovers from the move-out, I decided to clear it all out at once.  There isn’t any reason I couldn’t do it other than a desire to be kind to my garbage folks.  But I made the move, and 10 large contractor trash bags were piled up on my curb, in addition to my normal garbage bin.  It wiped me out.

The result was pretty dramatic.  About a quarter of my garage space has opened up.  I’ll spend a little bit organizing the recently-formed clutter of rehab supplies, like paint, paint supplies, sawhorses, tools, hardware and then the future dream of returning the garage to a garage can start to form.  In the meantime, I can bring in some of the more environmentally sensitive items from the shed, like ladders.  I’ll need them for painting, anyway.

I still have a couple more items that I’m not sure what to do with.  There are are a couple of entertainment centers from when the garage used to be a media room.  They’re broken down right now to save space, but maybe I need to reassemble them and take them to a thrift store.  I also have some old parts for my car that could probably be sold off that could clear out a shelf or two.

But the end result of this is good; I’m happy, and that’s the primary goal here.  Thanks and apologies to the garbage crew.

Project: Removing Popcorn Ceilings

This is one of the most ambitious projects I am attempting on my own.  I readily admit I’m not too handy, and many times, I start a project only to later call a professional to fix it all up.  But this one seemed achievable to me.

To be on the safe side, I’m going to start in low-risk areas so if I do mess it all up, or if I don’t do that great of a job, the results won’t be as noticeable.  The first attempt is the master bedroom closet.

I had purchased the recommended popcorn scraper w/catch bag bracket and I had a garden sprayer already.  I purchased paper floor covering just in case.  On a whim, I purchased an extension pole for the scraper.  After everything was purchased and ready to go, I charged right into it.

I laid down the floor paper and sprayed the ceiling.  Sat through the waiting/soaking period and tentatively tried out the scraper on the pole.  It sucked.  I took the pole off, climbed up on a step stool and scraped again.  Better, but I still didn’t have the hang of the technique yet.

One of the drawbacks to the scraper is that it couldn’t go all the way to the wall, so I had to use a 4” putty knife anyway.  The wall edges were really difficult.  Because they are wall seams, there’s a lot of joint compound and tape in there.  It’s a real balancing act to not scrape off too much.  Since it was my first attempt, I scraped off too much plenty of times, exposing the tape and in one case, a screw.  I also gouged the ceiling in a few places and ripped up the drywall paper a few times.  All technique stuff that you have to learn as you go.

Then I had to wait a day for everything to dry before the next step.  The next step was sanding and patching.  I muddled through that and in some case, left things worse off than when I started, especially with the wall edges.  I’m very inconsistent with drywall patching.  A lot of times, I put the spackle on and it just seems like a glob.  So I sand it down and it’s no better.  So I spackle again and sand it down again and keep doing this over and over until I just give up.  The problem with that process is it takes so long for the spackle to dry (probably because I’m globbing it), so I only do one cycle in a day.

Because my stages were so long, I decided to parallelize and do a couple other closets: the master linen closet and the pantry.  Both of them had that terrible ClosetMaid shelving installed.  So I pulled out all the shelving before starting, since I was going to repaint the walls anyway.

The pantry is an embarrassment. When I first moved in to the house, I had some left-over tester paint from a room I terribly painted.  I figured I’d just throw the paint on the pantry walls to use it up.  What a disaster.  I never took off any of the shelving hardware, so they all had this dark green paint all over them.  This time around, I insist on doing things better.  So I removed all the plastic hardware and soaked it in hot water for a day.  Then I used a scrubbing sponge to remove all the old paint.  Tedious, yes, but I deserve it for screwing it all up in the first place.

Back to the ceilings.  Removing the popcorn from the other two closets was pretty easy.  I just used the 4” putty knife since the rooms were so small.  I limited the amount of destruction this time around, too.  I patched the ceilings up and waited for them to dry up.

Back in the master closet, I was getting anxious to get the project done.  I was stuck in a place of “Is it good enough?”  Yes, I could feel some roughness around the edges, but did I need the ceiling to be glass-smooth?  So, for better or worse, I jumped to the next stage – priming.  I had purchased oil-based Kilz (odorless, thank god) for this step.  Since it’s been a long time since I’ve painted, I felt like a complete idiot fumbling with all the different pieces involved: paint cup, paint cup liner, brush, paint tray, paint tray liner, roller, roller cover, paint can, paint can opener, rubber mallet, paint drips everywhere, cleaning rag, drop cloth, extension pole.  I didn’t have any logical workflow or plan to work with all these things efficiently.  So I got a little frustrated even though I tried to go slowly.

I started cutting in on the ceiling, standing on a step stool with the paint cup and brush.  Immediately, I remembered how much I suck at painting.  In my favor, I am going to be repainting the walls, so it didn’t matter if I got primer on the walls.  So, slap, smoosh, smear all over the wall and ceiling corners.  I was surprised at how quickly the primer disappeared, or at how much it felt like I had to put on.

After going around the edges twice, I poured the remainder of the primer into the paint tray and got the roller with the extension pole going.  Yup, I still really suck at this.  Whatever, it’s just primer.  Again I was surprised at how quickly the primer went and had to refill the tray.  When I finished, I was pretty fed up with the whole task, so I just left everything and took off.  Hours later, I realized I never washed the paint brush, so that’s probably ruined.  I did wash the roller, but I suspect that won’t be usable a second time.

But after those few hours, I went back to see what I had done and how badly I had done it.  You know what?  It’s not too bad at all.  Having the ceiling a uniform color really helped me see where this project was going.  With the exposed drywall and seams and patches, I wasn’t able to visualize how this would end up looking.  Now I did.  And yes, I did clearly see the spots where I knew I had more patching to be done, but I knew about those.  The part I was more worried about was the areas where I didn’t know if more work was needed.  And it doesn’t seem it was needed.  Having 8’ ceilings, you can’t see that level of detail, and further, once I have the wardrobe cabinets installed, you won’t be able to see the wall edges at all.

The takeway from this is that it isn’t all that hard to do (just really time-consuming and nerve-wracking).  So now, I can clean up the patches in the other two closets, prime them, patch up the master closet one last time and prime it, then I can actually paint the ceiling and walls for real.
Failed Project: Relandscaping

After removing the shrubs in the front garden bed, it was my plan to grow grass in it and just put potted plants and things there for decoration.  Then it was pointed out to me that the pots would kill the grass underneath, so I decided I would fill the bed with stone.

I had a lot of stones from the clearing of other garden beds.  And I spent a lot of time digging up stones in the bed I was was working with.  I finally had enough of sifting dirt so I went to fill the bed.  I laid down weed barrier, carried a bucket of stones over and dumped them in.  Immediately, I knew I was in trouble.

I thought I had a lot of stones.  I thought I had a ton of stones.  I had nowhere near enough.  Seven buckets of stones didn’t even cover 20% of the area I needed it to cover.  I needed literal tons, not figurative tons, of stones to fill in the bed.  Nope, not spending money on a bunch of rocks.

So, after that disappointment, I left the few stones in place and cleaned up, figuring I needed to think about this for a bit.  Grass probably wont work.  I don’t want to spend money on rocks.  What about mulch?  I hate mulch, too, but maybe rubber mulch…

I’ll price out some mulch this week and see if it’s worth it.

Project: Cleanup, Day X

I’m continuing with the overwhelming task of cleaning up what all has been left behind.  Since I work for a company that deals with foreclosed properties, I have seen photographs of what the industry calls “trash-outs”.  When a property is vacated and foreclosed on, the articles inside must be disposed of.  While my situation isn’t the same as having a pile of used diapers in the corner of a room, I do have piles of garbage bags, primarily of paperwork and office supplies.

Yesterday, I got a lucky break.  While my neighbor was over dropping off his lawn cut invoice, I explained my situation.  Turns out his daughter has some sort of charity for the homeless and might be willing to take some of the “donate” pile.  She came over within an hour and took all of the donate pile.  Well, she has to come back today for the rest because we filled her truck.  That cleared out a third of my staging room.  In fact, I’m going to try offloading some extra stuff in that deal.

That leaves the shred pile and trash pile to process.  The shred pile should be handled in a couple weeks and the trash pile will probably shrink over a period of months.  I had an epiphany a few days ago that I should just rent a dumpster and throw it all in there.  That solution is a bit too costly.  I could rent a large truck and haul it to the landfill and pay whatever surcharge they have for dumping.  Or I could just dispose of it slowly over time, which is the cheapest route.

I also tentatively brought out the vacuum cleaner to clean up the floor of the emptied bedroom.  Have you seen the floor of a room that’s been untouched for five years, except by a large, shedding cat?  It was a multi-stage process, for sure.  The trash pile gained 8 boxes of old business files yesterday, which will let me clear out another room in preparation of floor cleaning.

The project continues…

Project: Cleanup, Day 1

Yesterday, the final stage of my house repossession happened.  The first was the purchase, the second was the title transfer, the third was the refinance, and the final stage is the move-out.  My former co-owner finally moved out of the house, taking only the most important things along.  Of the unwanted stuff, first dibs went to a friend and second went to the movers.  The remainder was left behind for me to deal with.

The first thing I did was change the locks.  I had purchased a re-keying kit and really botched the first deadbolt lock while learning.  One thing I learned was that my locks were 6-pin, and the kit was for 5-pin.  This resulted in the 6th pin spring getting jammed up in the cylinder.  The end result of fixing it was a 4-pin lock.  The other locks were fixed efficiently, but I still feel a bit suspicious, so they will probably eventually be swapped out with new ones.

The next step was sorting the left behind material.  Things had to be sorted into donate, trash, shred, and keep piles.  I was surprised to see there was actually very little for the donate pile.  That is, until I made it to the closet.  I filled up 3 lawn bags of clothing, and probably half of the clothes still had the price tags on them – incredible.  Two full lawn bags of just hangers.  The trash pile is huge. 

I got quotes from companies for mobile document shredding.  The price varied from $65/bin to $85/bin.  A bin is a 95-gallon toter, which they say is about 10 document boxes or about 300 pounds.  So that’s not that bad of an expense.  I will probably schedule that in a week or so.

As far as the keep pile, it’s pretty much limited to office supplies and maybe some other things that are useful.  I did find a $20 travellers check.  Haven’t seen one of those in decades.  I have to figure out how to cash it.

Fortunately, I have a very large unused room (the former garage) to stage all these piles.  There’s no shortage of drop boxes for donations, so I can spread the wealth every night.  It’s going to take months of disposal in my weekly garbage bin pickup to clear the trash pile out.  At the same time, I’m going to rid myself of other decorations and things from the past.  This is a fresh, new start.

Dust Settlement

On a recent trip to Key West, I visited a museum of a treasure hunter whose catchphrase was, “Today’s the day!”  And for me, today’s the day.  Today, the moving truck arrives and the ex is finally vacating the property with whatever possessions she chooses to take with her.  It’s an event five years in the making.

This week has been a process of sorting out what stays, what goes, and what gets disposed.  The best way that I was able to describe my handling of the situation is “turbulence”.  It’s like there’s all this dirt lying all over the place.  Obviously that’s not a good thing, but I was used to it.  I didn’t mess with it, I just walked around it.  But this week, all that dirt is being moved and stirred up.  It’s irritating and stressful in its own way.  But I know, soon it will all settle down.  There will be less of it and I can safely dispose of it and finally be done with it.  I’ll have no more dirt in my house.  The dust settlement begins today.

It’s going to take a while.  There’s a lot of stuff that is not going and needs disposal.  I’ll need to hire a shredding service for probably a couple hundred pounds of files.  I’ll have to slowly dispose of non-sensitive files for weeks and weeks in the garbage.  I’ll have so many goodwill/salvation army drops, I’ll probably be on a first-name basis when I’m done.

But, this is also a reboot.  I get to start over again.  And in some ways, it’s better than the alternatives.  I’m in the same place I was 10 years ago.  While most people start over in a brand new place, I have the advantage of saying, “I’m not doing that again.”  I know what’s good and what’s bad, whereas in a new house, you don’t know what’s bad yet.

I just got a call that the movers are going to take a lot of things that were going to be left behind, so I will come home from work tonight to a much emptier house and then my work begins in earnest.  Up to this point, I’ve been busying myself with outside changes and improvements.  Now I have an entire interior to work on.  And my list is looooong.

Classing The Joint Up

In the meantime, while I’ve been laboring outside, I’ve been doing some interior planning.  Around the time that the house purchase was being finalized, The GF and I came across a large original oil painting at a decent price.  It’s an abstract piece and I chose it to be the new focal point for my living room.  The two original oil pieces that I have now are in a genre called abstract illusionism and are both by the same artist: J Kugler.  The new painting is by an artist I can’t find any info on (because I don’t know the name).  I’m in the process of hassling the seller to hassle his art dealer to get me the name of that artist.  This is slightly more important now because I recently found what appears to be another original piece by the same artist in another store.  Of course, that seller had zero idea who it was or where it even came from.  So, I would like to have two sets of two original paintings by two artists.  That would be pretty solid.  But, I really want to know how the artists are.

I’m embarrassed to say that even though I know that how you decorate your house speaks volumes about you, this house says little to nothing about me.  And that’s probably an accurate reflection about how I felt while living there.  The one room I claimed as solely my own does actually say a bit about me, but the rest of the house, nope.

And that’s going to be changing.  I have a fair amount of art that I can hang up, and at least one more piece is planned to be purchased.  I’ve done my fair share of reading on art collecting and I’ve come up with some personal guidelines for how to proceed.

First guideline is that I have to like it.  It sounds like a weird guideline, but consider the simple statement, “Wouldn’t that look good in the dining room?”  And that could lead to a case where, yes, it may look nice, but it would be buying art for the benefit of the house.  And everything that I know about houses is that they don’t really have any art preference.  The guideline also brings with it the difficulty of “I love it, but where would it go?”

Second guideline is that is has to be quality.  Quality comes at a price, unfortunately.  But, that also brings exclusivity and a bit of cachet.  Like my CD collection, my art needs to be discussable.  You can either have knowledge of the art’s subject or of the artist, but you should be able to talk about what you find exciting about the piece.  This is why I am pushing to get the artist’s info so I can speak with knowledge instead of just “Isn’t it nice?”

The third guideline is that it has to be elegant and simple.  There is a recent explosion of multi-piece paintings that fit together like puzzles or become broken murals.  While these designs don’t exactly turn me off, a lot of times it feels that the structure of the elements overpowers the image that is being portrayed.  Bluntly said, it’s kind of gimmicky.  I’ll stick with single art pieces and try not to clutter a wall with too much art or decoration.

My history in art and décor has gone through plenty of back-road detours and I got stuck in the “I have no idea what the hell I’m doing” rut like so many young adults do.  Some of the worst items I’ve ever decorated with:

  • An incense burner shaped like the grim reaper, where the incense smoke would come out of the empty hooded face.
  • A large, hanging porcelain light in the shape of a skull – life-size or maybe slightly bigger.  Its name was “Beaner” for the number of times you accidently hit your head on it.
  • A painting on black velvet.  Not Elvis, but an eagle.  Yup, I’ve actually owned one.  When I sold the painting at a garage sale, it got a lot of attention.  I don’t understand.
  • My high school prom glasses.  Nothing says “I haven’t grown up” any better.

With those days far behind me, I’m able to make a fresh new start.  Or at least get back on the path I started when I bought my first original paintings almost 20 years ago.

Slow Progress

I haven’t posted any real updates because I haven’t really completed anything.  I have some things upcoming, though.

For the most part, my work has been limited to sifting soil, which is about as exciting as it sounds.  The front garden bed, which used to contain shrubs, is now just a dirt patch.  My original plan was to plant grass there and put flower pots to decorate the area.  My GF, who is much smarter than me, asked why I didn’t put rock there.  Well, I hate rock.  That’s why I was getting rid of it in the pool planters.  But, she commented, isn’t putting pots on the grass just going to kill the grass under them?  Hmmm.  I guess I didn’t think that one out well enough.

So, I guess it will be a rock bed then, with pots for decoration.  So now I need to convert this dirt bed into a rock bed.  Not surprisingly, before it was shrubs, it was a rock bed, so there is no shortage of rock in there.  The problem is, the height of the bed is already over the walkway.  So, I need to lower the bed by a couple of inches and salvage the rocks that are in the dirt.  Doesn’t that sound like a great way to spend evening after evening?

And its not as simple as just digging up some dirt and rocks and sifting them out.  There is an absolutely horrific root system left behind by the shrubs.  It’s a combination of big roots snaking about 6-8 inches underground, and a fine mesh of roots that just clog everything else up.  So, shovel, hoevator and rake are getting a healthy workout.  Plus, I bought some screen mesh and fashioned a small colander to fit inside the bucket for sorting.

I’ve been collecting the rocks in buckets.  Every time I drop in at Lowe’s I pick up more buckets.  I have 7 buckets of rock so far.  Not all of it is from the front garden.  Half of them are from the pool planters, which is the other project that is nearing completion.  Hopefully, I’ll be able to cross that one off my list soon.