Side Project – Breaker Box Mapping

You would think that something like a electrical breaker box would be a pretty static thing in your house.  At best, some new breakers would be added as your electrical needs change and grow.  But somehow over the 30 years this house has been around, things have really moved around.  The list of breakers and their descriptors don’t all seem to align, and the descriptors themselves, well, some never made sense.  What is the “Nook”?

So today, in the freezing and consistently dropping temps, I decide I’m going to take the time to figure out what controls what in my breaker box.  Spoiler: there are still unknowns.

I’ve had this desire to do the mapping for a long time.  When I started, my plan was to buy 2 dozen night lights from Dollar Tree and plug them into every outlet, then monitor which ones went out as I flipped breakers off.  That was back when Dollar Tree had items for $1, so the cost of that plan has gone up since then.  And also, it was just excessive.  You can assume if one outlet in a room goes dead, the rest are also in line with that circuit.  So, in the end, I just made it work with a plug-in light and a live circuit tester for the hard-wired smoke detectors.

I began with the single breakers, which are supposed to control rooms, lights, or a single appliance.  I ended with the double breakers that controlled things like large appliances or the pool system.  I had most of the lights on in the house and I would flip off one breaker, walk around, and make notes about what outlets and lights were off.  I have a detailed Visio diagram of all the outlets, lights, switches, fans, etc in the house, so I just marked notes there.  I also made an excel file with the breaker positions and their existing descriptions, which I then updated.

When it was done, I had one single breaker that I have no idea where it goes, so I left it off until I figure that out.  I also have two double breakers that I’m unsure of.  One controls the pool pump, but it was getting too cold for me to continue, so I can test that on another, warmer day.  I’m not sure if there are two or three double breakers for my full HVAC system.  One breaker is labelled with a white sticker label “AC” and one is labelled “Heat”.  I don’t know if there is one specifically for the blower or not.  It’s too cold to experiment with that right now.

I found out the “nook” is the two outlets on the wall in what I consider the dining area.  I found out the entire west side of the house: the two guest bedrooms, the bathroom, and the hallway are all one one single breaker.  And I’m running two computers, my studio equipment, and my stereo all on that circuit.  10 amps?  Maybe 4 at the most, but still.  It’d nice if the rooms were on different circuits.

Also, the entire master bedroom and bathroom are on one circuit.  Also, there is one GFCI circuit that winds through the whole house, running the whole garage, bathroom outlets, and my office on the lanai.  I knew this was true, and I knew the problems with it.  The worst part about the configuration is that it’s all stopped by a GFCI outlet in the garage.  If it pops, everything dies.  I can probably improve on this and let each segment have its own GFCI protection, so if the outlet in the garage pops, the bathrooms and my office keep running.  If a freshly-installed GFCI outlet in my office pops, it doesn’t affect anything else downstream.  Ditto with the bathrooms.

So this is all in preparation for the upcoming solar installation, because as part of that, there is going to be a electrical panel reconfiguration, where a subpanel will be installed with a limited number of breakers that will remain powered by the battery.  I’ll need to choose which items I want to include in the new subpanel, and wouldn’t I look like a fool if I didn’t know what to include.

Curious how complex the house wiring is?  This is the diagram:

image

Solar Electric – Financing

The plan was to get three quotes for solar installation.  I got two.  The first I already discussed.  The second company, which was recommended by my pool tech, was somewhat of a letdown.  The original contact only did pool solar, so he was going to pass off my info to someone else.  That didn’t happen.  I called back and set up another appointment with someone else.

The appointment was a bit more sales-y than the first.  A lot more information meant to be convincing, for people on the fence.  More stuff about financing and return on investment.  They made a big deal about their installation, which I will admit was pretty impressive.  However, it wasn’t impressive enough to justify their price, which was nearly double the first company.

When there’s that much discrepancy, you have to wonder why.  I looked at both quotes with whatever details I could extract from them.  They use different panels, which isn’t surprising.  They use the same microinverters, same batteries, same interconnects.  It’s not really that much different.  So, I guess the first is still in the lead.

The third company I took on the recommendation of a coworker.  I filled out their online form and got no response.  Then I called their number and set up an appointment.  They said they would call the day before to confirm, which they did.  While confirming the appointment, they asked a couple of questions that didn’t sit well with me.  I’d call them “likelihood questions”.  Like, would you say your credit score is over 640?  And, are you the sole homeowner or is the house jointly owned?  These questions essentially tell the salesperson if there’s a chance the deal will fall through for some external reason.  Maybe they don’t want to spend as much time on those people.  Sounds like timeshare sales, to me.

But in the end it didn’t matter because the sales person no-showed.  I waited an hour and then went off to lunch.  No calls, nothing.  So if their website doesn’t work well and their sales team is sketchy and flaky, probably don’t want to work with them.  So the first installer wins out.

So next step, getting the financing.  Interesting that this blog started with a bunch of posts on house financing when i was looking for a new place and now I’m back at the bank for a home equity loan.  It’s been a long time.

First step is unfreezing the credit files, which, fuck Experian.  Their website is garbage.  Couldn’t log in, couldn’t create an account.  Called their number and the bot says my credit file is not frozen, so I did all that for nothing.  Later in the day, I get an email from them to finish setting up my account.  I get it set up and I see my file is frozen.  These people have NO clue.

Anyway, at the bank, who is using Experian by the way, They fill out my application pretty quickly since I’m already a customer.  Some odd questions, like my ethnicity, like isn’t that in my customer profile already?  It doesn’t change.  What gender I identify as, which I suppose could change on a whim. And then more pointed questions.  What’s the purpose of the loan?  What’s the purpose of the home improvements?  How long have you lived there?  What was your down payment when you bought the house?  What improvements have been done to the house?  What do you expect your house valuation to be?  It’s so weird.  It’s like, you should be able to access everything about me that’s financially relevant from my credit file, everything relevant to the house from public records, and so you ask pointless questions.

After going through all that, the application goes off to another department to make a determination (I remember this part) and since it is a Saturday, I probably won’t know until Monday. But I expect it’s probably going to go through.  So here’s the details.

I’m taking out more than I need, just in case.  I figure I can pay it back early.  However, this does have a consequence.  The interest rate for a loan is at one level for 1-5 yrs, then another for 5-10 yrs.  Since I can’t swing the payment for 50k in 5 yrs, they set it up for 10 yrs, which give me an interest rate of 5.375%, and a payment around $365/mo.

Now on the topic of Finance.  Some people really, really make interest rates the end-all for everything.  I’m sure that some would admonish me for not doing everything I could to get the term to 5 yrs and get that better interest rate.  But what’s the point?  I’m not going to run the loan to full term anyway.  First I make a big payment with whatever is left after the installation, I make another big payment with the tax credit, then I’m paying nearly double the monthly payment.  I’m not going to feel a huge bite due to the difference in interest rates between the two terms in the length of time I’ll have the loan.  No reason to stress.  Things are going to work out.

Now, I was sure to ask about a pre-payment penalty, and to my surprise there was one.  But the terms are unlikely to affect me.  First, the penalty is repayment of any appraisal fees the bank pays for and also some other closing costs.  That’s not unreasonable.  And then, it’s only if you pay the loan off in 36 months or less.  I’ll be pretty lucky if I can pay this off in 3 years, but I can certainly draw it out to 37 months if I need to.

So I might be signing a sales contract by Thanksgiving.  Will I get installation and activation by the end of the year so I can get the tax break this year instead of having to wait?  We’ll have to see!

Solar Electric – Salesperson #1

I just finished my first meeting with a Solar electric salesperson and I’ve learned a whole bunch and at the same time, I am relieved that they were not one of the high-pressure, full-service, let us do everything and own you types of companies.

Let’s start with the end.  Cheapest option is $32k.  A version with upgraded, higher-wattage panels is $35k.  A version with battery storage is $45k.  A version that allows battery storage in the future is $37k.  So anywhere from $32-45k, which is right in line with my expectations.

Here’s the first bit of interesting knowledge I got.  My local electric provider does not allow attachment of any system >10kWh to their grid.  So you are limited in what you can install.  That’s fine, it has kept the price within range anyway.  The company usually plans to design a system that will generate 100% of your usage, unless you plan to have an electric car, in which case, they will design something that generates >100%.  But since I can’t do any more than 10kWh, that doesn’t matter.

Next, it is possible to have both net metering and storage.  To do this, you should to have your system planned to do it from the start.  Some terms were kicked out, like Supply tap and Load-side tap and islanding and envoy.  Basically what all that says is that you need to build your connection to the grid in a way that if the grid goes down, your system disconnected and does not feed the grid.  With a normal supply tap, when the grid is down, your panels stop feeding the grid.  With a load-side tap, when the grid is down, an extra piece of equipment disconnects your house from the grid and your panels keep feeding your house.

Other miscellanea: Because my breaker panel is full, I’m definitely looking at a system panel upgrade.  That’s an extra piece that will probably be $2-3k.  All of the paperwork and permitting of the system is done by them.  This installer uses a third-party warranty plan that covers all aspects of the system even if the original manufacturer or even the install goes out of business.  30 year warranty, I think.  I did not ask if it was transferrable – I should have.  45-day price guarantee on a quote, then subject to re-evaluation.  Company has been around for 15 years.

I want to have a payment of about $650/mo for 5 yrs.  At current interest rates, that’s about $34k.  What’s very tempting about this is whatever I spend in this improvement is effectively 30% off because of the tax credit.  So if I’m going to do it, I should go big, because getting that battery backup system at 30% off is a one-time offer.

So, off to schedule #2.

Solar Electric – Initial Planning

I have some big plans in mind, and this post is just to get the rough idea down and keep a record of what should ideally happen and how.  But yes, the plan is to install solar panels on the house.

First, let’s hit the high-level numbers.  I want to budget $30k for the install.  This should give me a a $650.mo loan payment for 5 years.  This should eliminate my $200/mo electric bill, so the cost is net $450/mo for 5 years.  There is a 26% tax credit for solar electric, so that should wipe away 1 year from my loan.  The end result is a $50 cost for 4 years, then $200/mo savings for the next couple of decades – let’s be real, for the rest of my life.

Now, some details on those numbers.  In most people’s lives, the two big debts are house and car.  Ideally, you want to have some sort of break between car loans where you actually still use your car without paying for it.  I do have an active car loan, but that car is my secondary car and I am still getting by on the car that preceded it.  So I can be assured of a long time before I will need another car loan.  So once that car loan is paid off, I will be free to begin another 5yr commitment.

It was my plan to go solar when that car loan was ended, but I was concerned about the sunset of the federal tax credit for solar, which is very soon.  I have recently had a fortunate windfall that can pay off my car loan, should I choose to use it for that.  Because I am debt-adverse, I will do so, regardless of those that say to drag out low-interest loans and invest the difference.

So, with car loan eliminated, I will need to gather quotes from solar contractors and decide on what is available to me.  With what tools are available to me, I was able to determine that my home electric usage ranges from 1200 to 1850 kWh per month, with an average of 1490 kWh.  That’s roughly 50 kWh/day.

According to Project Sunroof, a $200/mo electric bill means I would need a little over 16kW in solar to cover my bills.  From other sources, I found my roof has a max capacity to deliver 20kW in power.  One site says I need 50 panels to get 15kW.  Another says 30 panels will get you 10kW.  One metric cited is that it costs about 75 cents per watt, so 15kW is about $11k in panels (I assume no labor or connective bits).  Another site says ~$30k will get you ~14kW.  So far, we are still in the ballpark.

This does not cover any battery storage on site, which is enticing to me, but could be prohibitively costly, and some of what I’ve read suggests either you have storage or you feed the excess to the grid, not both.  That’s for the experts to educate me in.

Then the real battle becomes dealing with multiple sales people all wanting to sell you a product and a service.  That will be for a later post.  For now, I think this covers all the basic numbers.

Whole-house Surge Protection

A couple of weeks ago, my pool pump started failing.  The bearings were wearing out and it was getting louder by the day. So I discussed replacement with the pool guy and he asked if I had any house protection insurance, which I didn’t think I did.  He said that I should look into it because the new motor would be easily damaged by power surges.

To take a step back, it’s been a few years since you couldn’t get a simple, dumb, single-speed motor for your pool.  The law now says you have to have a variable speed pump.  It should save money because you can slow it down during off times.  Whatever.  They’re more expensive and more susceptible to damage because they’re chock full of circuit boards.

That got me to thinking of something I wanted to get on the house anyway – whole-house surge protection.  The electric company offers this as an option or you can install one yourself.  I looked up the one offered by the utility company and they don’t sell it, you lease it.  Like $30 for installation, then $8/mo for as long as you want.  Well, that’s never good in my book.  I need to own something, not lease it.  So I called a couple electricians to get quotes.

The first guy says he installs them, but not right now because he’s too busy.  He referred me to someone else and I set up the appointment.  On the call he said I could choose from a range of different devices.  He couldn’t give me much specifics on them, so I just said, what can I get for under $500?  He said, you can get this.  So we agreed on it, and off we went.

Just to mention, I do understand that $500 is like five years of leasing the electric company protector.  But ownership is very important to me and is just one more line item for if I ever choose to sell the house.  Apparently, this is standard for all new construction.  It should be!

On the appointment day, the contractor was pretty much behind schedule, like a hour and a half.  Whatever.  He looked over my breaker panel, which was full and said he could just install it on the meter box.  I actually preferred that option, so that was good.  Within half an hour, he was all done.  I came out, saw the new box attached to my meter and said, ok.  Now for the billing.

I had a recollection he quoted me on the phone something like $425, and so I assumed he would have labor on top of that, so I budgeted $600.  Nope, the total cost was $425.  Well, that’s not too bad.  I happily paid and off he went.

The new device is by SquareD and is the model HEPD80.  I went inside and researched the device.  It is very highly rated, which was great, but the cost of the device kind of hurt me.  It’s only $120 at the most.  So I did get charged for labor, but like $600/hr.  Just typing that out hurts even more.

But I try to keep everything in perspective.  The total was less than I expected.  I am helping an independent contractor survive and thrive.  The installation is not something I could do myself.  Well, I could, after watching a few videos, but I wouldn’t have a lot of faith in myself.  And the product is still highly rated and installed by a professional.  Hopefully it never needs to sacrifice itself for the house.

But, if it does, this device will save me from having to buy another $1500 pool pump, plus a $1500 chlorine generator, plus whatever appliances would get blown up, plus whatever UPS’s didn’t survive the blast.  For a $120 device, that’s pretty well worth it.  Next time, I’ll buy the device and just have the contractor install it.  Knowledge for next time.

New Couch Coming Soon

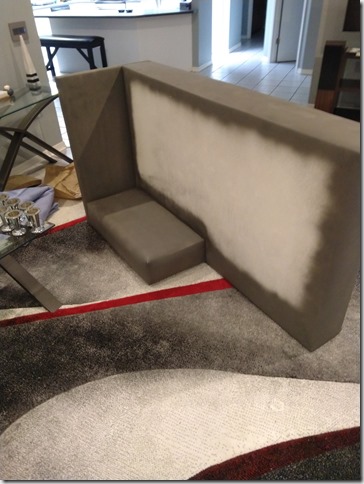
And that means, say goodbye to the old couch.  This couch has been here for, I don’t know, close to 15 years.  It was purchased at a contemporary furniture store that had a lot of eclectic stuff, with corresponding eclectic prices.  This couch met the needs of the time as far as style and budget and to be honest, has been pretty solid the whole time.  That’s not to say it’s been great.  The white vinyl stained and the chaise cushion continually slid out of place, leaving the back cushion to fall down.

The staining of the vinyl led to an experiment with painting the vinyl.  The initial appearance was really good, but the durability was absolutely terrible.  And with the couch now mostly painted, and looking in poor shape, it wasn’t eligible for donation.  I could do it, but not in good conscience.  So off to the dump.

How to get it to the dump?  Well, I have a station wagon, so let’s see if it will fit.  I took some rough measurements and the couch is almost an exact fit.  Lucky me.  However, I can’t get the two pieces of couch to interlock together so I can take them together.  So that means there’s going to be some destruction involved.

IMG_20210917_193954_01The first thing to do is to get the legs off.  Here you can see that I did not spray paint the non-visible parts of the couch, to save paint.  So no one would want to buy a couch like that, even from a thrift shop.  The legs, you can see, are removed and sitting on the coffee table.

Then it’s a matter of dragging the couch out to the garage to figure out how to take it apart.

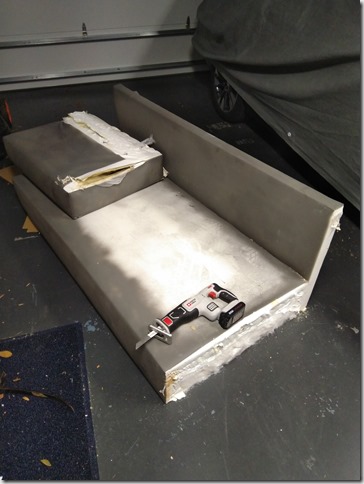
The first thing I tried to do was take a sledgehammer to the back and sides.  I don’t really own a sledge, I just have a tiny hand sledge that I just use to pound things.  And so, pound I did, and nothing was really giving.  So it was time to do what the pros do – break out the Sawzall.

IMG_20210917_194009_01The Sawzall is one of those tools that is used in just about every DIY or home remodeling show.  I swear these people think it’s the greatest tool on earth.  I’m neutral on it.  I don’t have as much use for it, but I guess I should be glad to have one, because the few times I did use it, there wasn’t really any other alternative.

The first attempt at cutting was sort of lame and left me feeling stupid.  I didn’t think about the blade I was using and was using a course-tooth wood cutting blade.  I put the blade between two seams in the frame and started cutting.  It went smoothly for a while, then stopped.  I pushed through that and then realized, I had just cut through a screw.  I should be using a fine-tooth blade for metal cutting.  Duh.

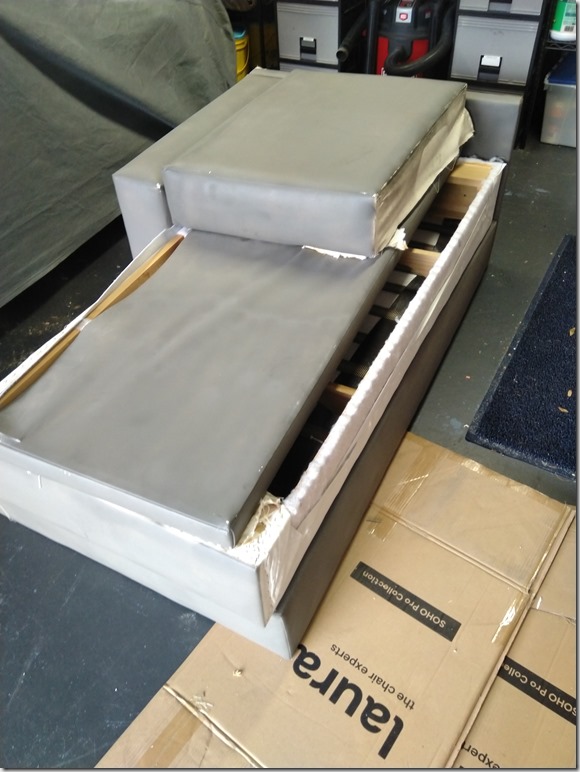
A swap of blades and things went much smoother. Once I had that one piece separated, I had a better look at the construction of the couch.  It’s just a bunch of wood frames with vinyl streched over them, screwed together.  Gee, I could make one of these if I wanted.  But anyway, I saw the way the pieces were secured together and I thought it would just be better to find the screws and unscrew them instead of sawing through them.  So I did.

I used a utility knife and cut the fabric and vinyl to expose the frame, found the screws, which had been bent with a hammer to prevent any poking from happening, and removed them.  The back of the couch just slipped right off.

With the one half of the couch in three pieces, I could easy stack everything together into one bundle for transport.

IMG_20210918_185814_01

That’s all there is to the couch that took up all my living room.  Next weekend, it’s going to a landfill.  And I did get an answer to a question I had about the couch earlier,  It absolutely is a hand-made piece.  They used drywall screws throughout the construction.  Again, I could make one of these if I wanted to.

Studio Room

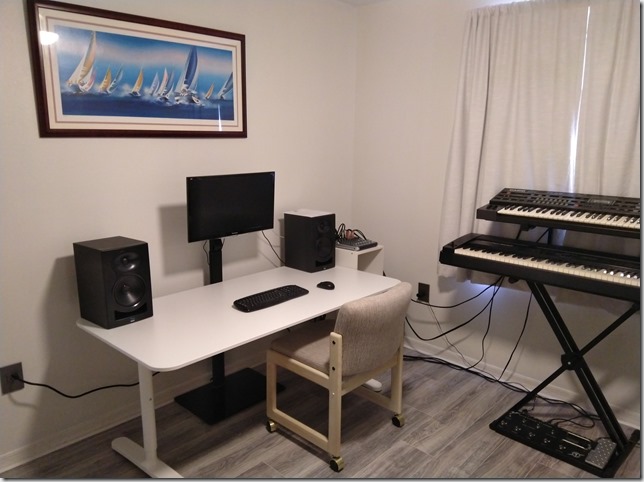
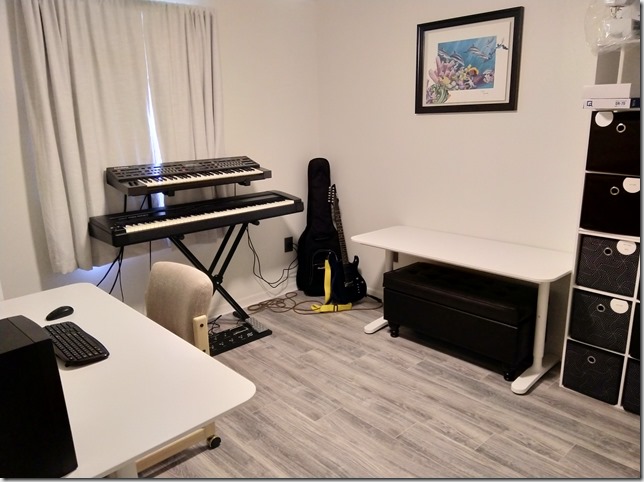
Formerly known as guest bedroom.  The room was completed last weekend and is now being utilized as designed.

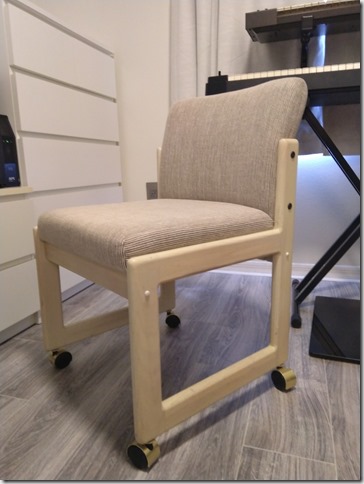
So the first thing was finding a chair for the desk.  I had a desk planned out – moderately cheap Ikea – and wanted a decent chair.  I ended up with this one, which seems more and more of an oddity the more I consider it.

IMG_20210718_162214

All of the furniture was moved out to the garage for planned pickup by Salvation Army.  And then I had to get the desk from Ikea.  I was comparing the desk options to what I already had in my main office and the desk top I wanted was a little smaller than my existing one.  That memory is important and led to my first mistake.

At Ikea, I was just trying to be quick about the purchase and after finding out where the items were found in the warehouse, I went and grabbed the pieces.  The desk top was 55″, which is smaller than my desk, which is 63″.  I also bought the coordinating desk frame and rushed them home.  I built the table right away and when it was complete, something felt really off about teh finished product.

It was too small.  I measured it again.  Yes, it is 55″.  I measured my office desk.  Yes, 63″.  I looked online at Ikea’s catalog.  Oh.  The desk top I should have purchased was 62″, still smaller than my office desk.  So, I suddenly had a backup desk for the room.  That’s not too bad, because it was actually part of the eventual plan to have a craft desk in the room.  It just happened sooner than expected.

Back to Ikea to purchase the right size desk.  At checkout, I planned to pay cash and when the two pieces were rung up, it was more than I expected.  How do I keep screwing this up?  So I split the payment between cash and card, rushed the items home and built them up.  Now I had the right size desk.

And later, I reviewed the receipt from Ikea and it turns out the cashier rung up two desk frames instead of a frame and a desktop, which explained the extra $50.  Lesson learned.

So anyway, I had all the pieces.  Along with the desk, I had purchased new studio monitors and also a power strip to switch everything off and on at once.  With everything in place, this is the result.

IMG_20210725_121250IMG_20210725_121303

Chairs. Just Chairs.

A couple posts ago, I mentioned that I was looking for a high-quality chair for what will become my studio room.  Elsewhere, I discussed the aggravation in finding a suitable chair in the flood of garbage on the Internet.  The result of all of this has been a bit of capitulation on multiple fronts.

Primarily, since we’re talking about the studio room, I have decided I don’t require a top-grain leather office chair for this.  Comfort is still important, but since it’s going to be a low-utilization piece of furniture, I can let it slide.  I based part of my decision on my history.  Way back when, I used kitchen chairs as desk chairs.  They were comfortable and they worked absolutely fine.  So I opened my options up and went shopping.

And that’s the second bit.  Internet shopping is good for some stuff, but not really for furniture.  Not only for the fact you have to experience what you’re buying, but when you’re buying a single chair, you can find some interesting options in clearance areas of furniture stores.  One-offs, singletons, scratch-and-dents.  While I love and put a priority on quality, I do love a good bargain, and I like rescuing things, too.

Yesterday, I visited a furniture store I’d never been to before.  I assumed it was all fancy, formal stuff and I wouldn’t find anything, but it never hurts to look.  I used to love just browsing stores, but COVID sort of put a damper on that activity.  Anyway, in this store, they sold Stressless chairs and once again, I am astounded that anyone purchases those things.  I can’t see spending over $3k on a chair when you can get a sofa for 1/3 the price. 

But anyway, I did make it to the clearance section: a room with no AC, on the top floor in the corner of the building with half the ceiling lights turned off.  (If they were trying some sort of dissuasive psyche tactics on shoppers, they went way overboard.)  In the farthest corner of the room, there was a chair with no matching anything around it.  It was white wood and cloth, but was as basic as it could be and it sort of drew me in.  They gave me a quote of $100 for it and I left it for consideration.  Today, I think I’m going to move on it.

But yesterday, I didn’t have my mind made up.  I stopped at another store (actually 3 other stores, but the others were fruitless) and found a decent top-grain leather office chair that wasn’t obnoxious.  I looked at the price tag and was only mildly shocked.  It was on sale, $50 off!  Sale price: $850.

So here’s the final capitulation.  I had budgeted $300 for my “nice” office chair.  Research had shown me that a $300 budget was ridiculously low for the quality I was demanding.  Not that $300 won’t get you quality, don’t mistake me there, it is just not “lifetime” quality, which is what I am seeking.  $800-1200 is pretty much the going rate for a chair that will really last.  And I still don’t buy into the $3k Stressless chairs. 

Adding to all that, finding a style that is agreeable to me, and is not stupid expensive, and is top-grain leather, is definitely a rare find.  To be sure, I’ve looked at every major furniture store online and in person and not found another model that meets those criteria.  So I guess I’ve found my next office chair.

So there’s a $100 chair and a $850 chair added to my list.

Living Room AV

So the plan was to simply go to Ikea and buy a Besta unit and be done with it.  However, it appears that the pandemic has caused a severe inventory problem for Ikea.  Nothing is in stock and no idea when that will be resolved.

Not being interested in waiting longer than I have to, I began looking online for other AV units.  In all the different images, a few caught my eye.  Some had to be discarded because the dimensions wouldn’t work out.  Eventually I settled on one.  And in a strange way, it’s just the right one.  It’s a larger version of the credenza I have in the master bedroom.  Ok.

The delivery came last night and I wasted no time in putting it together and getting everything into it.  By the end of the night, I was able to listen to some music and the cats were jumping around the room.

IMG_20210708_174655

Here’s the initial placement with the speakers.

IMG_20210708_175344

Then with the components in place.

IMG_20210708_180256

Everything now in place.

IMG_20210708_211636

And all fired up.

I think I’m going to shift everything just a little to the right to line up the speaker with the end of the wall.  Not sure if I’m going to remove that artwork that’s partially blocked by the TV yet.  Still determining what décor items to fill in the empty spaces.

Guest Bedroom Redux

The actual title is “Guest Bedroom“.

Since this isn’t the blog for personal ruminations (look elsewhere for that story), this will just focus on the effects of the changes to the house.  And to sum up the changes, I’m getting rid of my guest bedroom.

So, the future plan is to make it another music room.  I have my music room right now, which I term, “the listening room”.  This new room is going to be a studio room for my music equipment and recording.  So maybe I need to rename these rooms “recording” and “playback”.  And with the bathroom situated between them, that should be called “pause”.

Now, on to the plans.  First of all, old furniture needs to go and new furniture needs to come in.  I called a donation center and was told they don’t take mattresses, so I planned on taking the mattress to the dump.  While searching for a moving bag for the mattress, I saw a vacuum bag, which gave me the idea to just compress the mattress and store it.  Maybe at some point in the future I’ll need a guest mattress.  If it’s compressed, no big deal.

But I will need to dispose of the bed frame, which is not good enough to donate, and the dresser and night stand, which can be donated.  They can go with the old TV stand from the living room.  All the other storage units in the room can stay.  And then, it’s time to get new stuff.

I will have my keyboard stand, guitar, and a monitor stand that also holds the recording computer.  That’s what I’m starting with.  What I’m looking forward to is not using a mini keyboard/trackpad on the computer and not having to stand or sit on a hard barstool.  I will get a nice table top where I can have a full keyboard and mouse and room for the mixer and other peripherals.  I’ll get a nice comfortable chair where I can spend an extended period working over song mixes instead of giving up after 30 minutes from body aches.  And I’ll have room to move instead of being crammed into a corner.

Tentative budget:

  • Table: $150
  • Chair: $300 (not going to skimp on this)
  • New studio monitors: $300

The timeframe is two months, tops.  Lotsa pieces coming together right now.  New TV stand arrives tomorrow.  Mattress bag over the weekend.  I can schedule a pickup of the furniture next week, chop up the bed frame for the garbage.  If things work out, I’ll have a small windfall of cash within a month to finance this and much more.

Say goodbye to this mess.

IMG_20210707_193953

The speakers in the lower-left will be out in a couple days.  The box on the floor is the new stereo for the living room.  The PC on the left has to stay.  We’ll make that work.  But anyway – progress!

I told myself: The house is yours, you should use all of it.  I listened.